Increasing the size of disks got a lot easier with the release of Update 2 for ESX 3.5 and VirualCenter 2.5.
You no longer have to login to the console and use the vmkfstools command.
How to expand the disk drive(s) of a Windows Virtual Machine
Please read the entire document before beginning any steps.
This document has the following assumptions:
- You are running ESX version 3.5 Update 2 or greater and VirtualCenter Update 2 or greater which allows disk expansion through VirtualCenter. Previous versions required using vmkfstools through the ESX service console.
- Your C: and D: drives are separate disks vs. two partitions in the same vmdk file.
There are two distinct processes depending if you are expanding a system drive (i.e C: drive) or a non-system drive (i.e. D: drive or any other data only volume). If the pagefile is located on the D: then it becomes a system drive and follows the same process as if it were a C: unless you want to take the extra step to remove the pagefile from the D:.
Process 1 – Expanding the D: drive or any non-system drive
No need to shut the VM down. These steps can be performed with no downtime.
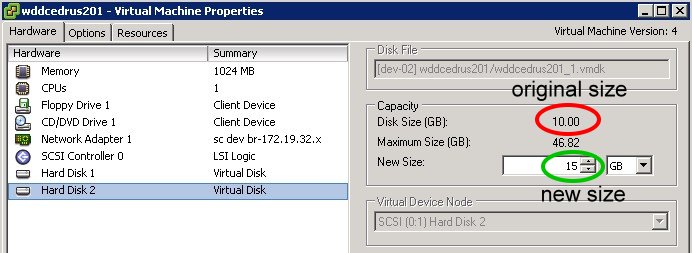
- Using VirtualCenter right click on your VM and choose edit settings.
- Select “Hard Disk 2” (assuming that is your D: drive).
- On the right hand side type in the desired disk size in the “New Size:” field.

![]()
- Click “OK”.
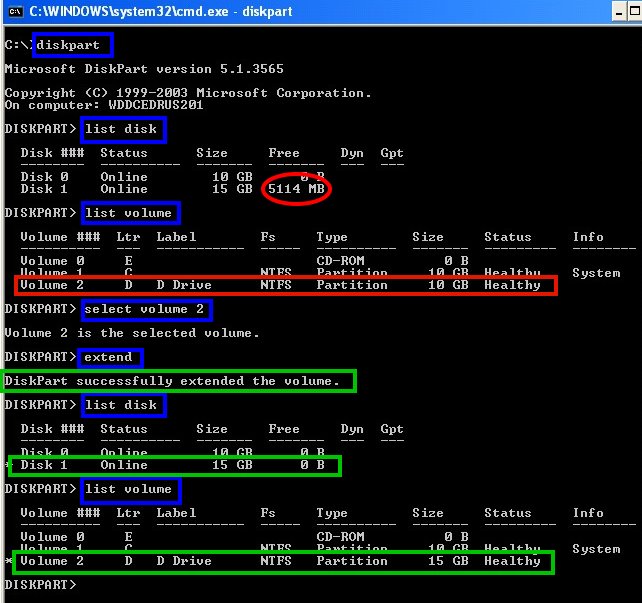
- Login to the VM and open a command prompt.
- Type “diskpart”
- Type “list disk”. You should see the disk you expanded with the additional capacity listed under the Free column.
- Type “list volume”. This will show you all the drives defined on the system.
- Identify the volume number that matches your D: drive and select it by typing “select volume #”.
- Type “extend”. Your D: is now expanded to include the free space that was added.
- Verify this by again typing “list disk” to check for “0” to be listed under the “Free” column.

Process 2 – Expanding the C: or any system drive
This will require downtime for your VM. You will also need to use an additional VM which we will call the helper VM.
- First step. Shutdown your VM.
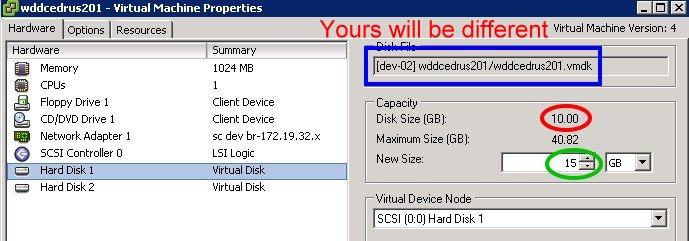
- Using VirtualCenter right click on your VM and choose edit settings.
- Select “Hard Disk 1” (assuming that is your C: drive).
- On the right hand side type in the desired disk size in the “New Size:” field.
- Observe the location where the disk file is located on your storage.

- Click “OK”.
- With your helper VM up and running, use VirtualCenter and right click on your Helper VM and choose edit settings. This can be done with the help VM down as well. The helper VM will have to be shutdown later to remove the extra disk.
- Click the “Add” button.
- Select “Hard Disk”.
- Click “Next”.
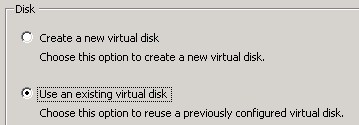
- Select “Use an existing virtual disk”.

- Browse to the location of the C: you expanded and select the correct .vmdk file.

- Click “Next”.
- Click “Next” again.
- Click “Finish”.
- Click “OK” to close the Helper VM properties.
Since we added hardware to a running VM we have to make the OS aware of it.
- Login to your Helper VM.
- Open “Device Manager”
- Right click on the server name and choose “Scan for hardware changes”
![]()
- Type “diskpart”
- Type “list disk”. You should see the disk you expanded with the additional capacity listed under the Free column.
- Type “list volume”. This will show you all the drives defined on the system.
- Identify the volume number that matches the C: for the original VM. On the helper VM it will be listed with the next available drive letter, drive F: in this case. Select it by typing “select volume #”.
- Type “extend”. Your drive is now expanded to include the free space that was added.
- Verify this by again typing “list disk” to check for “0” to be listed under the “Free” column.

- Shutdown the helper VM.
- Edit the settings of the helper VM and remove the drive you just added.
- Click “OK” to close the Helper VM properties.
- You can now power on your VM and verify the changes.